A dirty microwave can quickly become a headache when food splatters dry onto the walls, grease builds up, or a burnt smell lingers after cooking. The good news is that you usually don’t need a strong chemical cleaner or a lot of scrubbing to get it clean.
The easiest way to clean a microwave is to loosen stuck-on food with steam, then wipe the inside with a soft cloth and a mild cleaner. You can also use simple ingredients such as lemon, vinegar, or baking soda for certain messes and odors. Whether you have a GE, Samsung, Whirlpool, LG, or Frigidaire microwave, always check your owner’s manual first because cleaning instructions can vary by model.
In this guide, you’ll learn how to clean a microwave from the inside out, remove grease and burnt food, freshen unpleasant odors, clean the turntable and door, and avoid common mistakes that can damage your appliance.
How to Clean a Microwave?
You can clean most microwaves in about 10–15 minutes. Start with steam to soften dried food. Then wipe the inside with a soft cloth and mild dish soap.
1. Turn Off the Microwave
Make sure the microwave is off before you start. If your owner’s manual says to unplug the appliance before cleaning, do so. Let the microwave cool if you have just used it.
2. Remove the Turntable
Take out the glass turntable and roller ring. Remove any loose crumbs or food from the bottom of the microwave. Wash the turntable with warm water and dish soap. Check your owner’s manual before putting it in the dishwasher.
3. Steam the Inside
Pour about 1 cup of water into a microwave-safe bowl. Place the bowl in the microwave and heat it for about 3–5 minutes, or until the inside becomes steamy.
Do not remove the bowl right away. Let it sit for a few minutes so the steam can soften dried food. Carefully remove the hot bowl. Use a thick towel or oven mitt if needed.
4. Wipe the Interior
Use a clean, soft microfiber cloth or sponge to wipe the:
Most food should come off easily after steaming. For greasy spots, add a small amount of mild dish soap to your damp cloth. Do not use steel wool, rough scouring pads, or sharp tools. They can scratch the microwave’s interior.
5. Clean Stubborn Spots
If food is still stuck, do not scrape it hard. Wet the spot again and let it soften for a few more minutes. You can also use a small amount of baking soda mixed with water for a stubborn spot, but check your owner’s manual before using any cleaning product.
6. Clean the Door and Controls
Wipe the inside and outside of the door with a soft, damp cloth. Clean around the handle and door edges where food and grease can collect. For the control panel, use a slightly damp cloth. Do not spray cleaner directly onto the buttons or display.
7. Wash and Replace the Turntable
Clean the glass tray and roller ring with warm, soapy water. Dry them before putting them back. Make sure the turntable sits correctly on its roller ring before using the microwave again.
8. Dry and Check the Microwave
Wipe away any remaining moisture. Look inside for food residue, damaged surfaces, or unusual marks.
If you notice sparks, a burning smell, a damaged door, or peeling or burnt interior material, stop using the microwave. Cleaning will not fix an internal appliance problem.
Quick answer: The best way to clean a microwave is to loosen food with steam, wipe the interior with a soft cloth and mild soap, wash the removable parts, and dry everything before use.
What Do You Need to Clean a Microwave?
You do not need a long list of cleaning products to clean a microwave. A few simple items are enough for most food spills, grease, and odors.
Here is what you may need:
You do not need to use all of these items. Warm water, a soft cloth, and a little dish soap are often enough for routine microwave cleaning. If you use lemon, vinegar, or baking soda, check your microwave’s care instructions first.
Avoid steel wool, rough scouring pads, abrasive cleaners, and sharp tools. These can scratch or damage the surface inside your microwave.
1. How to Clean a Microwave With Lemon?
Lemon is a simple way to freshen a microwave while steam loosens food and grease. It works well when your microwave has a light mess or a food smell that lingers after cooking.
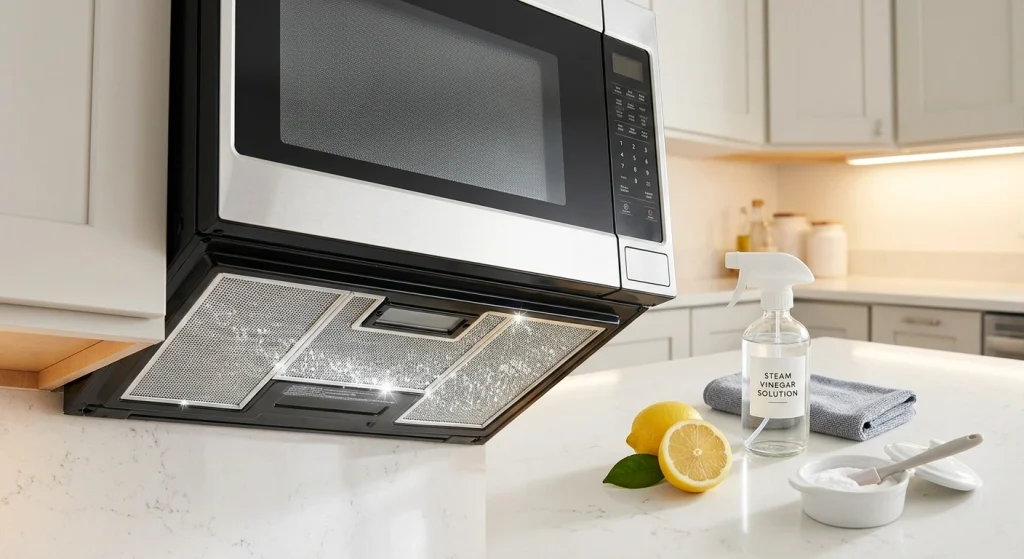
The steam does most of the cleaning work. Lemon mainly helps freshen the microwave and can make food odors less noticeable.
Can Lemon Remove Grease From a Microwave?
Lemon steam can help loosen light grease, but it may not remove heavy or baked-on grease by itself. For a greasy microwave, use a small amount of mild dish soap on a damp cloth after steaming.
Do not use lemon juice as a substitute for your microwave manufacturer’s cleaning instructions. Some models may have special interior coatings or cleaning requirements.
2. How to Clean a Microwave With Vinegar?
White vinegar can help loosen light grease, food residue, and some stubborn smells. The easiest method is to dilute it with water and use the steam to soften the mess.
Does Vinegar Remove Microwave Grease?
Vinegar can help loosen light grease, but it is not always the best choice for heavy grease. A small amount of mild dish soap is often more useful when food oils have built up on the microwave’s interior.
You also do not need vinegar for routine cleaning. Plain water and steam can handle many everyday spills.
Is Vinegar Safe for Every Microwave?
Not necessarily. Microwave interiors and coatings can vary between models. Before using vinegar or any other cleaning product, check the care instructions for your appliance.
Avoid mixing vinegar with bleach or other cleaning chemicals. Use one cleaning method at a time and keep the microwave well wiped and dry.
3. How to Clean a Microwave With Baking Soda?
Baking soda can help with stubborn food spots and lingering odors. It is best used as a gentle spot cleaner rather than a heavy-duty scrub.
For a microwave with a strong food smell, you can also place a small open container of baking soda inside the cold, turned-off microwave for a few hours. Remove it before using the appliance.
Can Baking Soda Remove Burnt Food?
It can help with some dried or burnt food residue, but do not try to scrape hard at a stain. Start with steam to soften the food, then use a soft cloth and mild cleaning solution.
If a dark mark remains after cleaning, it may be permanent discoloration or damage to the interior coating rather than leftover food.
Never use steel wool, rough scouring pads, or sharp tools with baking soda. Even a mild cleaner can scratch the microwave if it is applied with an abrasive pad.
4. How to Remove Burnt Food From a Microwave?
Burnt food can stick to the microwave walls and leave a strong smell. Do not try to scrape it off with a knife or rough pad. A safer approach is to soften the food first and then wipe it away.
1. Remove Loose Food: Make sure the microwave is off. Remove the turntable and pick up any loose pieces of burnt food.
2. Steam the Microwave: Add about 1 cup of water to a microwave-safe bowl. You can add a few lemon slices if you also want to freshen the smell. Heat the bowl for about 3–5 minutes, or until the inside is steamy. Let it sit for a few minutes after heating.
3. Wipe the Softened Food: Carefully remove the bowl. Use a soft, damp microfiber cloth to wipe the burnt area. If the food is still hard, repeat the steaming step instead of scraping harder.
4. Treat Stubborn Spots: For a small spot that will not come off, use a little mild dish soap on a damp cloth. You can also use a baking soda and water paste if your owner’s manual allows it.
Wipe the area again with a clean, damp cloth to remove any cleaner.
What If a Burn Mark Does Not Come Off?
Not every dark mark is leftover food. Heat can sometimes discolor the microwave’s interior surface. If the mark remains after careful cleaning, do not keep scrubbing it.
Pay close attention to signs of damage, such as peeling paint, exposed metal, burn marks, or repeated sparking. These are not normal cleaning stains. Stop using the microwave and have the appliance checked if you notice them.
A clean-looking microwave is not the only goal. The interior should also remain safe and in good condition.
How to Remove Bad Smells From a Microwave
A microwave can hold onto strong food smells after cooking popcorn, fish, sauces, or burnt food. Air fresheners will only cover the smell. The better approach is to clean the food residue first and then deal with the odor.
1. Clean the Food Residue: Check the walls, ceiling, floor, corners, and area around the door. Even a small piece of dried food can cause a strong smell. Steam the microwave with about 1 cup of water for 3–5 minutes. Let it sit for a few minutes, then wipe the inside with a soft cloth.
2. Use Lemon to Freshen the Microwave: Add a few lemon slices or some lemon juice to the water before steaming. The warm steam helps loosen residue, while the lemon can leave a fresher scent.
3. Try Baking Soda for Lingering Odors: For a microwave that still smells after cleaning, place a small open container of baking soda inside the cold, turned-off microwave. Leave it there for several hours or overnight. Remove it before using the microwave.
4. Clean the Turntable: Food can collect under the glass tray and around the roller ring. Remove both parts and wash them with warm, soapy water. Dry them fully before putting them back.
What If the Burning Smell Does Not Go Away?
A strong burning smell that remains after you have removed the food may point to a problem that cleaning cannot fix.
Stop using the microwave if you notice a burning electrical smell, smoke, repeated sparks, or unusual sounds. Do not remove the outer cover to look for the problem. Microwave ovens contain electrical components that can be dangerous even when the appliance is not running. A food smell should improve after a good cleaning. A persistent electrical or burning smell needs more attention than a cleaning solution.
How to Clean a Microwave Turntable?
The glass turntable collects food, grease, and crumbs as you cook. Food can also build up underneath it, so cleaning the tray alone is not enough.
1. Let the Turntable Cool: If the microwave was running, let the glass tray cool before washing it. A sudden change from hot to cold can cause glass to crack.
2. Remove the Glass Tray and Roller Ring: Lift the turntable out carefully. Remove the roller ring underneath it if your microwave has one. Check the bottom of the microwave for crumbs, grease, or dried food.
3. Wash the Parts: Wash the glass tray and roller ring with warm water and mild dish soap. Use a soft sponge to remove food residue. Check your owner’s manual before putting either part in the dishwasher. Dishwasher instructions can vary by model.
4. Clean Under the Turntable: Wipe the bottom of the microwave with a damp microfiber cloth. Pay attention to the center area and the small parts that help the tray rotate. Do not pour water into the bottom of the microwave.
5. Dry and Replace Everything: Dry the tray and roller ring completely. Put the roller ring back in place, then set the glass tray on top. Make sure the tray sits correctly and turns freely before using the microwave.
Tip: If the turntable stops rotating, makes a grinding sound, or sits unevenly after cleaning, check that the roller ring and tray are positioned correctly. If the problem continues, the issue may be mechanical rather than a cleaning problem.
How to Clean a Microwave Door and Control Panel?
The microwave door can collect grease, fingerprints, and food splashes. The control panel also needs regular cleaning, but it should not be exposed to much moisture.
1. Clean the Microwave Door: Start with a soft cloth dampened with warm water. Wipe the inside and outside of the door, including:
For greasy marks, add a small amount of mild dish soap to the cloth. Wipe the area again with a clean, damp cloth to remove soap residue. Do not use rough pads or abrasive cleaners on the glass or door. They can scratch the surface.
2. Clean the Control Panel: Use a slightly damp microfiber cloth to wipe the buttons and display. Do not spray water or cleaning products directly onto the control panel. Too much moisture can get into the controls.
If your microwave has touch controls, follow the cleaning instructions in the owner’s manual. Some models may have specific care instructions for the panel.
3. Check the Door Before Using the Microwave: Cleaning is also a good time to check the door. Make sure it:
A dirty door is easy to clean. A damaged door is a safety issue. If the microwave door does not close properly, appears damaged, or the microwave runs when the door is open, stop using it. Do not try to repair the door yourself. Have the appliance inspected by a qualified technician.
How to Clean an Over-the-Range Microwave?
An over-the-range microwave needs the same basic interior cleaning as a countertop model, but the outside can collect more grease. It may also have a vent and filter that need extra care.
Brands such as GE, Whirlpool, Samsung, LG, and Frigidaire make many over-the-range microwave models, but filter and vent instructions can vary by model.
1. Clean the Inside First: Use the steam method to loosen food and grease. Wipe the ceiling, walls, floor, and corners with a soft cloth. Do not forget the area around the door.
2. Clean the Outside: Grease from the cooktop can collect on the bottom and front of an over-the-range microwave. Use a soft cloth with warm water and a small amount of mild dish soap. Wipe the surface, then use a clean damp cloth to remove soap residue. If your microwave has a stainless-steel finish, wipe with the grain when the manufacturer’s instructions recommend it.
3. Check the Vent and Filter: Some over-the-range microwaves use a grease filter to collect cooking fumes from the range below. Do not assume every filter can be cleaned in the same way. Check your owner’s manual for instructions on removing, washing, or replacing the filter. If the filter is washable, clean it as directed and let it dry completely before reinstalling it.
4. Keep the Vent Area Clear: Do not cover or block the microwave’s ventilation openings. Keep the area free of heavy grease and buildup. If you notice a damaged filter, unusual fan noise, poor ventilation, or another problem with the vent system, cleaning may not solve the issue. Check the manufacturer’s instructions or have the appliance inspected.
What Should You Never Use to Clean a Microwave?
Not every household cleaner is safe for a microwave. Harsh products and rough tools can damage the interior, door, or control panel. Avoid these cleaning methods:
1. Steel Wool and Rough Scrubbers: Steel wool and abrasive pads can scratch the microwave’s interior surface. Those scratches can make the surface harder to clean and may damage the coating. Use a soft microfiber cloth or sponge instead.
2. Oven Cleaner: Do not use oven cleaner inside a microwave unless the manufacturer specifically says it is safe for your model. Microwave interiors can have coatings that need gentler care. A simple steam-and-wipe method is a safer starting point.
3. Sharp Tools: Never use a knife, fork, razor, or other sharp object to scrape off burnt food. Steam the area first and let the food soften. Then wipe it with a soft cloth.
4. Too Much Water: A microwave should not be soaked or flooded with water. Keep liquids away from openings, vents, and electrical controls. Use a damp cloth instead of pouring water onto the surface.
5. Spray Cleaner Directly on the Controls: Do not spray cleaner directly onto buttons, touch controls, or the display. Put a small amount of cleaner on a cloth if the manufacturer’s instructions allow it.
6. Harsh Chemical Mixtures: Never mix household cleaning products together. In particular, do not mix bleach with vinegar or other acidic cleaners. You also do not need a strong chemical mixture for normal microwave cleaning. Steam, water, a soft cloth, and mild dish soap can handle most everyday messes. If you are unsure whether a product is safe for your microwave, check the owner’s manual before using it.
How Often Should You Clean a Microwave?
For most homes, a quick microwave cleaning once a week is a good routine. You should also wipe up large spills as soon as the microwave cools.
You may need to clean it more often if you use the microwave several times a day or cook foods that splatter easily.
A Simple Microwave Cleaning Schedule
| Cleaning Task | How Often |
|---|---|
| Wipe fresh spills | As soon as possible |
| Quick interior wipe | Once a week |
| Clean the turntable | Weekly or as needed |
| Wipe the door and controls | Weekly |
| Deep clean the interior | About once a month or when buildup appears |
| Clean or check the vent filter | Follow the owner’s manual |
Clean Spills Before They Harden
Fresh food splashes are much easier to remove than dried or burnt food. If sauce, soup, or grease spills inside the microwave, let the appliance cool and wipe it soon after.
This small habit can reduce scrubbing later.
When Does a Microwave Need a Deep Clean?
Give your microwave a deeper clean when you notice:
- Dried food on the walls
- Grease on the ceiling
- A strong food smell
- Food under the turntable
- Sticky areas around the door
- Heavy buildup that does not come off with a quick wipe
Regular cleaning is not just about appearance. Removing food and grease buildup can help keep the microwave easier to use and maintain.
Always follow the cleaning schedule and care instructions provided for your specific microwave model.
Microwave Cleaning Mistakes to Avoid
Cleaning a microwave is simple, but a few common mistakes can damage the appliance or make the mess worse. Keep these points in mind whenever you clean it.
1. Scrubbing Too Hard: Dried food can be stubborn, but hard scrubbing is not the answer. Rough pads and abrasive cleaners can scratch the interior. Try steam first. Let the food soften, then wipe it with a soft cloth.
2. Ignoring the Microwave Ceiling: Food often splashes upward while the microwave is running. The ceiling can collect grease and dried food just like the side walls. Wipe the ceiling during your regular cleaning.
3. Forgetting Under the Turntable: Food and liquid can collect under the glass tray. Remove the turntable and roller ring so you can clean the bottom properly.
4. Spraying Cleaner Directly on the Controls: Liquid can get into buttons, touch controls, or other openings. Instead, put a small amount of cleaner on a soft cloth if your owner’s manual allows it.
5. Using Harsh or Abrasive Products: Avoid steel wool, rough scouring pads, sharp tools, and harsh cleaners unless the manufacturer specifically approves them. When in doubt, use the gentlest cleaning method recommended for your microwave.
6. Removing the Waveguide or Mica Cover: Some microwaves have a small mica or waveguide cover inside the cooking cavity. Do not remove it just to clean behind it. If the cover is damaged, burned, cracked, or badly stained, check the manufacturer’s instructions or have it inspected.
7. Continuing to Use a Microwave That Sparks: A little food residue can sometimes cause a spark, but repeated sparking should not be ignored. Stop the microwave and check for obvious food or metal objects. If sparking continues, do not keep using the appliance. A technician should inspect it.
8. Cleaning Without Checking the Owner’s Manual: GE, Whirlpool, Samsung, LG, Frigidaire, Panasonic, Sharp, and other brands can have different care instructions. The basic steam-and-wipe method works for many models, but your owner’s manual should always take priority when it comes to cleaners, removable parts, filters, and special surfaces.
When Cleaning Isn’t Enough: Signs Your Microwave Needs Repair
Cleaning can remove grease, food splatters, and bad odors, but it cannot fix a damaged or failing microwave component. If your microwave still has problems after a thorough cleaning, it may need repair.
1. Your Microwave Runs but Does Not Heat
If the microwave turns on, the light works, and the turntable spins, but your food stays cold, cleaning will not usually solve the problem. The issue may involve an internal component that needs professional testing. Avoid opening the microwave cabinet to look for the problem. Microwaves contain high-voltage parts that can remain hazardous even after the appliance is unplugged.
2. Your Microwave Keeps Sparking
A small spark caused by food or grease may stop after you clean the interior. However, repeated sparking can point to a damaged interior coating, exposed metal, or another problem. Stop using the microwave if it continues to spark after cleaning. Do not scrape or remove damaged areas yourself.
3. There Is a Burning or Electrical Smell
A food smell usually improves after cleaning the inside, turntable, and roller ring. A persistent burning or electrical smell is different. If the smell remains, especially with smoke, unusual sounds, or heat around the controls, stop using the microwave and have it checked.
4. The Door Does Not Close or Latch Properly
A microwave door should close firmly and align correctly with the appliance. Cleaning around the door and latch area may remove food buildup, but it will not repair a bent door, damaged latch, loose parts, or cracked glass. Do not use a microwave with a damaged door or a door that does not close properly.
5. The Control Panel Stops Responding
If buttons do not respond, the display behaves strangely, or the microwave starts and stops unexpectedly, cleaning the control panel is unlikely to fix the problem. Use only a slightly damp cloth when cleaning controls. If the problem continues, professional inspection may be needed.
6. The Turntable Still Does Not Rotate
First, make sure the glass tray and roller ring are seated correctly and that nothing is blocking the track. If the turntable still does not rotate, the problem may be mechanical or electrical rather than a cleaning issue. Do not force the tray or try to repair the mechanism yourself.
When Should You Stop Using a Microwave?
Stop using the microwave and arrange for professional service if you notice:
Quick answer: Cleaning can fix food residue, grease, stains, and many odors. It cannot repair electrical, heating, door, control, or other internal component problems. If a microwave remains unsafe or does not work correctly after cleaning, stop using it and have it inspected by a qualified technician.
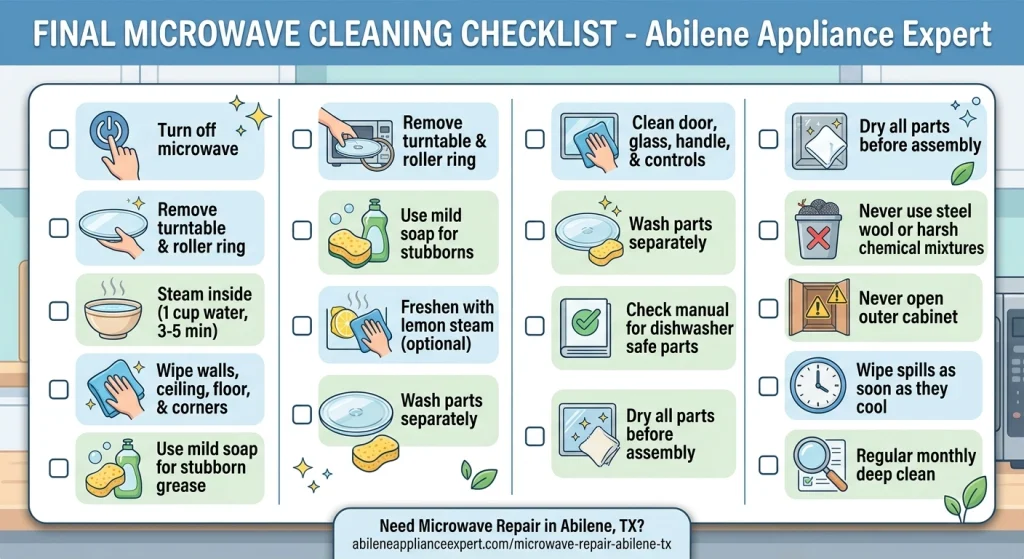
Final Microwave Cleaning Checklist
Use this quick checklist whenever your microwave needs a clean
Need Microwave Repair in Abilene, TX?
Cleaning can solve many everyday microwave problems, such as food buildup, grease, and unpleasant odors. But if your microwave still does not heat, sparks repeatedly, makes unusual sounds, or has a damaged door, it may need professional attention.
If you’re looking for microwave repair in Abilene, TX, Abilene Appliance Expert can help you identify the problem and determine the right next step.
Get Microwave Repair Help in Abilene, TX →abileneapplianceexpert.com/microwave-repair-abilene-tx
For safety, do not open the microwave cabinet or attempt to repair high-voltage components yourself.